Pages

8/31/2013

Oyako Domburi ふわとろ親子丼

My tips on making soft and half runny eggs on Domburi. 
(Japanese rish bowl dish)
For this one, I'm using chicken because thats basically what Oyako domburi is!
Instead of using chicken breast like me, 
I recommend using chicken thighs if you like.

今日のメニューは親子丼。
時間がない時でもすぐ出来ちゃうレシピです。
今回は鶏胸肉を使いましたが鶏もも肉でももちろん大丈夫です。
卵は固くなりすぎないように、
半熟親子丼を作っていきましょう〜!
(丼鍋がないので小さなフライパンで作ります)

(Serves 1 person)
1/2 Chicken breast or thigh diced in small pieces
2 eggs
1/4 onion sliced thin
1/4 green onions
1 tbsp of soy sauce
1 tbsp of mirin
2 teaspoons of sugar
80cc of dashi stock

(1人分)
鶏肉(胸肉又はもも肉)1/2枚
卵 2個
玉ねぎ 1/4個
長ネギ 1/4
しょうゆ 大さじ1
みりん 大さじ1
砂糖 小さじ2
だし汁 80cc 
In a bowl, combine soy sauce, sugar, dashi stock and mirin. Leave aside.
ボウルに醤油、砂糖、だし汁、みりんを入れ混ぜて準備しておく。

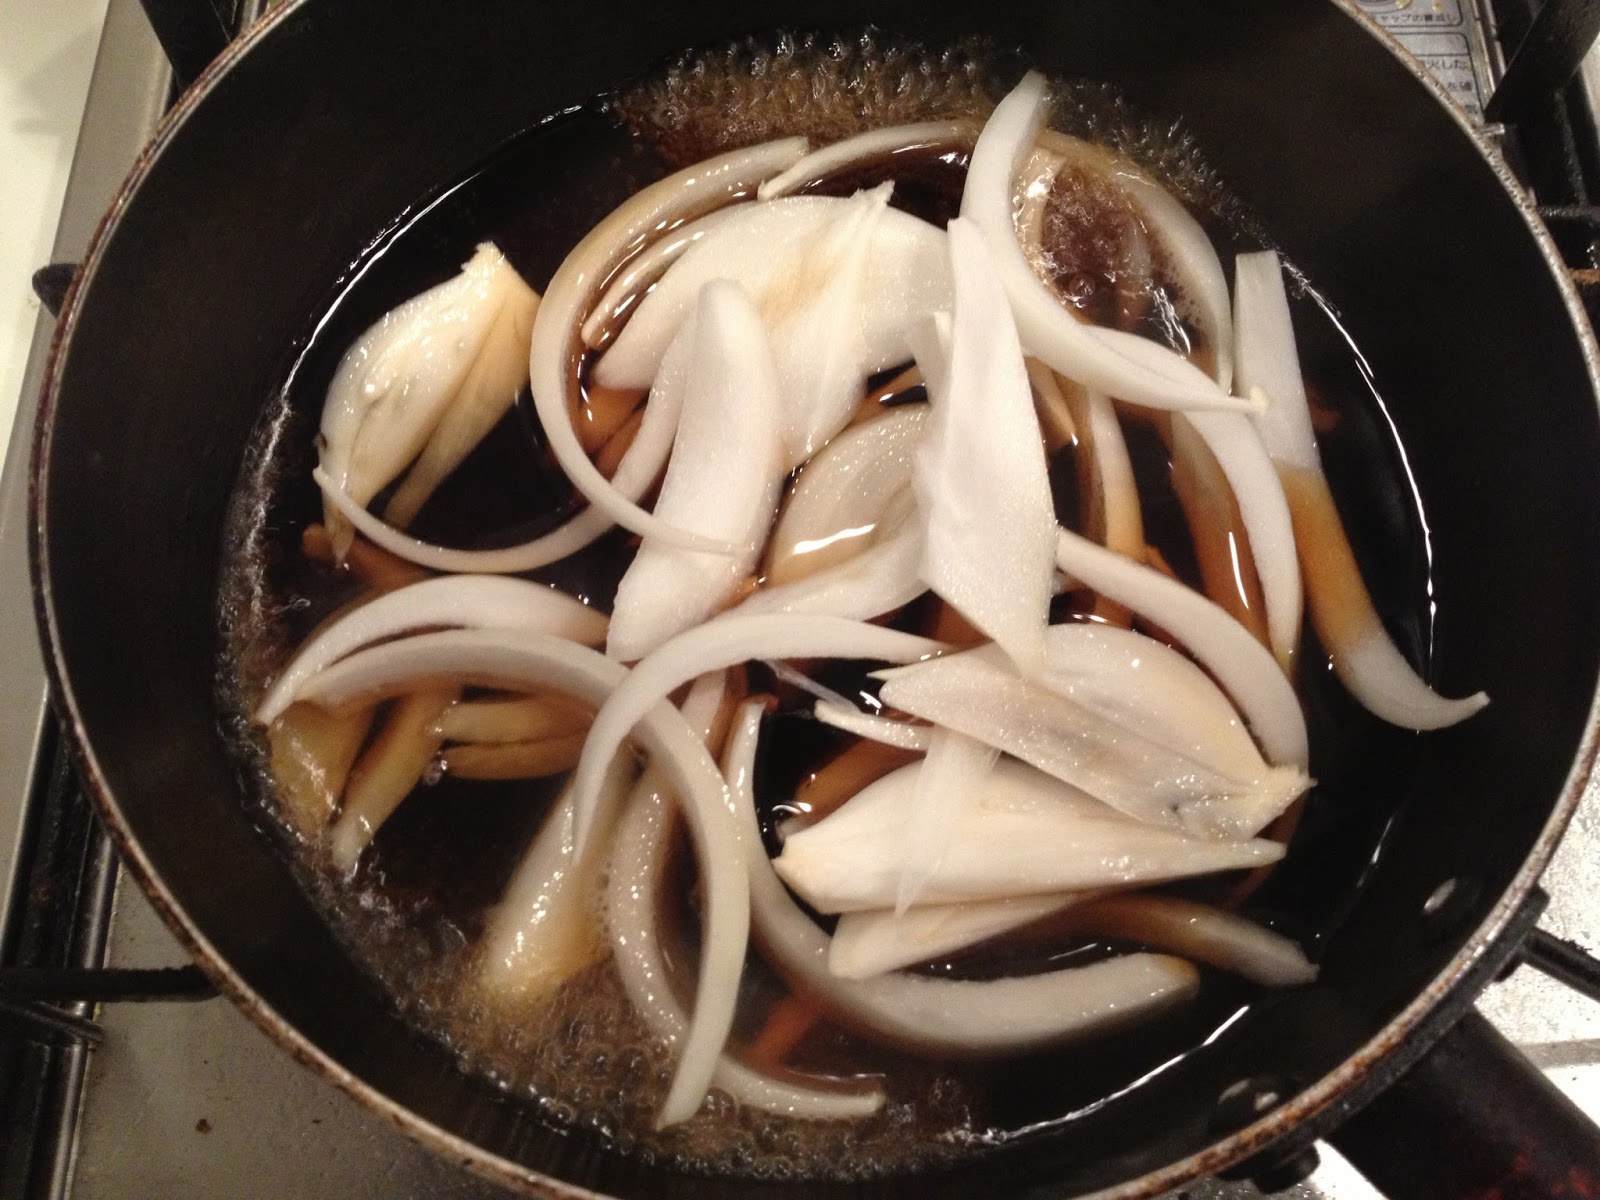
In a pan, add the previous mixture then put heat on medium to low heat,
add onions and cook until soft.
鍋に先ほどに作っておいたダシをいれ中〜弱火に火をかけ
玉ねぎを入れ煮る。

Add the green onions and cook until onions are a little softer.
長ネギも入れ玉ねぎと一緒に煮る。

Add chicken when the onions are a little softer, cook chicken until they are cooked.
鶏肉も入れ火が通るまで煮る。

 Meanwhile the chicken is cooking, crack 2 eggs in a bowl and mix.
When you mix the eggs, try not to mix too much or form much foam.
鶏肉を煮てる間に卵を2つ割り混ぜる。
ひらがなの「こ」の字をかくようにお箸を底につけながら
なるべく泡立てないように卵を混ぜる。

 When chicken is cooked, turn heat down to low and pour in the egg white,
leaving half of the egg (egg yolk) in the bowl.
鶏肉に火が通ったら弱火にし卵を入れる。
この時に卵白だけをいれるようにし、卵黄を残すようにする。
2回に分けて卵を入れていきます。
The egg white will change its color to white in about a minute.
1分程で卵が白くなってくる。

Now add the rest of the egg and turn off the heat after egg is added.
It will naturally cook with no heat.
残りの卵を入れ火を消し余熱で火を通す。

Pour it on top of rice and add some mitsuba greens on top.
ご飯の上に盛り三つ葉をのせて、出来上がり。

 If you like any of my recipes, please 'share' by clicking below :)↓↓↓

8/30/2013

Kailua Weekend 渋谷

Aloha!
After my workout at the gym, I stopped by at this Hawaiian Cafe in Shibuya.
Its on the 6th floor in Shibuya Hikarie building.

渋谷ヒカリエ6Fにある
カリルアウィークエンドというカフェに行ってきました。
いつも列が出来ているので中々行けるチャンスが無かったのですが
今日はたまたまいい時間帯に行ったため
スムーズに入ることができました!


Since it was super hot today and I just finished exercising 
I ordered some green smoothie to cool me down.
とりあえずドリンクはグリーンスムージーを注文。
すごく暑かったので冷たいスムージーが美味しかった。

For lunch I had shrimp & avocado eggs benedict.
It had fried shrimp patties instead of ham or salmon. 
I'll definitely put this in my recipe book! Shrimp eggs benedict, what a good idea!
えびアボカドのエッグズベネディクトを注文しました。
ハムやサーモンは食べたことあったけど
えびとは初めて!えびのすり身で出来ていて
これは真似できるレシピ発見!
えびが大好きなので美味しかったです♪
If you like any of my recipes, please 'share' by clicking below :)↓↓↓

CREAM Lunch Plate/CREAMランチプレート

I made another "Character" food once again
and this time, its ...
CREAM !!!
They make amazing music and... look! their avatars are adorable!
So why not eat CREAM for lunch... 
Unfortunately I will not have a recipe for this because
it look a little bit too much work, I didn't have enough time to 
take pictures and show you each step.
Although I can tell you what is made out of what.
So here it is,

今話題になっているCREAMのキャラクターを
使ってなんと!プレートランチを作ってみました。
残念ながら作っている間真剣になっていて
今回はレシピ無しです...ですが何をどこに使ったか
書いておくので是非CREAMファンの方々は作ってみてください^^

Staxx T
Face & Head - Rice flavored and colored with okonomiyaki sauce
Hair - Wrap some nori (dried seaweed) around rice
Sunglasses - Cut out pieces of nori for the black part and cheese for the white part.
Mouth and nose - Cut out pieces of nori and cheese for the teeth.

顔&頭:白ご飯を使用、お好み焼きソースでやや茶色に色づけ
髪:ご飯で形を作り上から海苔でかぶせる
サングラス:とろけるチーズと海苔をカットして形を作る
口&鼻:歯はとろけるチーズ、口と鼻は海苔をカットする

Minami
Face - Rice flavored and colored with okonomiyaki sauce
Hair - Yukari furikake mixed with rice 
Facial features (Eyelashes, eyes, nose) - Cut out pieces of nori and cheese for the teeth.

顔:白ご飯を使用、お好み焼きソースでやや茶色に色づけ
紙:白ご飯にゆかりふりかけを混ぜ紫色にし形を作る
目&口&鼻:目玉はとろけるチーズをカット
まつげ、まゆげ、目、鼻、えくぼなどは海苔をカット
歯はとろけるチーズをカットする


Hope you enjoyed!

If you like any of my recipes, please 'share' by clicking below :)↓↓↓

8/27/2013

Chickpea Croquettes/ひよこ豆のコロッケ

Chickpea croquettes also known as falafels.
They're easy, quick and tasty! So here it is,

ひよこ豆のコロッケ、ファラフェルという中東で
よく食べれる料理です:)
ピタパンに挟んで食べるのもオススメ。

(Serves 2-3 people)
380g of chickpeas (presoaked)
1/2 of onion finely chopped
1 clove of garlic finely chopped
fresh parsley
1 tbsp of cumin powder

Yogurt Sauce
2 tbsp of nonfat yogurt
1 teaspoon of salt
fresh chopped parsley
1/2 of lemon squeezed

(2〜3人分)
ひよこ豆 380g(水煮のパック)
たまねぎ 1/2 みじん切り
にんにく 1 みじん切り
パセリ
クミンパウダー 大さじ1


ヨーグルトソース
脂肪ゼロヨーグルト 大さじ2
塩 小さじ1
パセリ
レモン汁
In a blender add chickpeas, onions, garlic, parsley and cumin.
Blend until smooth.
ひよこ豆、たまねぎ、にんにく、パセリ、クミン、
をミキサーにかける。

Rest the mixture for about 10 minutes before frying.
10分程休める。

Meanwhile make yogurt sauce by simply 
mixing all the necessary ingredients.
休めている間にヨーグルトソースを作る。
材料を全て混ぜるだけ。

Drizzle oil in a pan and put on medium heat.
Fry the croquettes until brown all sides.
コロッケを揚げ焼きしていく。
油を少し気持ち多めにひいて中火で焼く。

Serve with the yogurt sauce.
ヨーグルトソースを添えて出来上がり。
If you like any of my recipes, please 'share' by clicking below :)↓↓↓

8/24/2013

Rosemary Bread/ローズマリーパン

Baking bread is easy...thats how I thought about it until few days ago
when I completely failed on my batch.
Its been a while since I baked bread, but its been one of my favorite things to do
since I was a teenager.
So! I learned from my mistakes and made another batch this morning.
If you are a beginner at this, you can follow through my steps carefully,
if you are experienced with baking bread, then try this recipe with aromatic rosemary inside.

2日前くらいにパンを久しぶりに焼いたところ...
大失敗していまい食べれないくらいのパンを焼いてしまったのです。
15歳くらいの時に初めてパンを作って
そこから今までずっとハマってます^^
今回のパンは余ったローズマリーを入れて香りのいいハーブパンに。
パン作り初心者の方はゆっくりレシピを見て作ってみてください。

(8 rosemary breads)
300g of bread flour
6g of dry yeast
3g of salt
1g of sugar
180ml of milk or soy milk (room temperature)
30g of melted or soft butter
rosemary
shredded cheese
black pepper

(パン8個分)
強力粉 300g
ドライイースト 6g
塩 3g
砂糖 1g
牛乳又は豆乳 180ml
溶かした/柔らかくしたバター 30g
ピザ用チーズ 
黒こしょう
Combine flour, butter, yeast, sugar, and salt in one bowl.
As you pour in the milk, pour it on the yeast so the yeast can start activating.
ボウルの中に強力粉、イースト、砂糖、塩、バターを入れ
牛乳を入れる時にイーストにかかるように入れる。

When everything comes together in a bowl, take it out an start kneading the bread.
Use the bottom part of your palm. Knead for about good 3-5 minutes until smooth.
少し形になってきたらボウルから取り出し
パンを3〜5分程しっかりこねる。
(しっかりこねなかったためこの前大失敗に繋がりました...)

After kneading add the rosemary and form into a ball.
こね終えたらローズマリーを入れてボールのように丸める。

Put wrap over the bowl and wait for about 1 hour, try to leave this bowl in a warm environment.
(under the sun, warm room temperature etc)
ボウルにサランラップをし第一発酵する。
日差しがあたる所やなるべく温度が高い場所を選び1時間放置する。
1 hour later...
1時間後...

Poke the dough with your index finger and if the dough doesn't bounce back,
your dough is ready to be worked again.
人差し指で押しガス抜きをする。
この時生地が跳ね返ってくるようであれば発酵時間を増やせば良い。

Divide into 8 pieces and form round balls.
Then use scissors to cut a cross on top.
Then again put wrap over the dough and place it in a warm place, leave for about 40 minutes.
8等分に分けボールを作る。
ハサミで上を十の字に切る。
また暖かい温度で第二発酵する、ラップをかぶせて40分程放置する。
↓ 
40 minutes later...
40分後...

Now add cheese on top with some black pepper.
In a preheated 180C oven, bake for about 20-30 minutes until golden brown.
チーズを上にのせ黒こしょうも少々かける。
180度に余熱させたオーブンに入れ20〜30分程焼く。
きつね色になれば出来上がり。

The color of the cheese turned out kind of funny because of the type of cheese I used...
so I recommend using any type of shredded cheese.
(I added some fresh parsley as garnish on top)
とろけるチーズを使ったので少し変わったチーズの色になってしまった...
なのでピザ用チーズなどを使うのをオススメします。
(最後に飾りでパセリを上の乗せました)

ローズマリーの香りがいい感じ♪
焼きたてほくほくでした。

If you like any of my recipes, please 'share' by clicking below :)↓↓↓


8/23/2013

Shabu-Shabu Salad/豚しゃぶサラダ

Even if you don't consider yourself a good cook,
you can make this shabu shabu salad easily within 20 minutes tops.
Basically all you have to do is prep and cut the vegetables and simply boil pork meat.

So here it is:
(Serves 3-4 people)
Get any vegetables you like.
(I recomment lettuce to use as a base to eat with pork.)
1/2 lettuce sliced thin
500g~600g of thin sliced pork shoulder
1/2 red bell pepper sliced thin
1/4 onion sliced thin, soaked in water
some green onions
1/4 cup of Japanese sake
1 boiled egg

Use ponzu sauce or sesame dressing to dress on top.

今夜は家族で簡単豚しゃぶ。
好きな具材や野菜をたくさんしゃぶしゃぶと一緒に食べました。
準備をするのに少し時間が掛かるので
野菜などの準備を全て終えてから最後に豚をしゃぶしゃぶする事。
お好みで色んなお野菜と一緒に食べてください。
(3〜4人分)
レタス 1/2 千切り
豚肩ロース薄切り 500g~600g
赤ピーマン 1/2 薄切り
玉ねぎ 1/4 薄切り 水につける
青ネギ
日本酒 1/4カップ
ゆで卵 1


After all the vegetables, boiled egg etc are cut and prepped, boil water with some sake.
After it comes to a boil, turn heat down on low and add pork meat.
Watch the pork change its color and take out immediately when all the pink is gone.
野菜やゆで卵などが全部下準備できたら鍋にお湯を沸騰させ日本酒を少し入れる。
お湯が完全に沸騰した後弱火にし豚肉をいれしゃぶしゃぶする。
色が変わった瞬間にすぐ網に取り出し水を切る。

Serve with ponzu or sesame dressing on top.
ゴマだれやポン酢をかけて出来上がり。

If you like any of my recipes, please 'share' by clicking below :)↓↓↓

8/22/2013

Rosemary Chicken Breast/ローズマリーチキン

Even though I was a fan of chicken thighs before I suddenly became a fan of chicken breasts,
maybe because I started becoming conscious of my health and the amount of protein I take in.
Most of the time I steam my chicken or grill it, although for tonight's dinner I wanted to add a little something more.
So here it is,

今日は鶏胸肉を使います
前までは鶏のもも肉ばかり買っていましたが
胸肉の方が高プロテインで身体にいいのを
分かってから最近はずっと胸肉ばかり買っています...
胸肉のレシピを探している方は是非これを作ってみてください♪

(Serves 1 person)
200g of chicken breast
1 tbsp of honey
2 strands of rosemary
2 tbsp of balsamic vinegar
salt and pepper
olive oil

ローズマリーチキン
(1人分)
鶏の胸肉 200g(お好みの量で)
はちみつ 大さじ1
ローズマリー 2本程
バルサミコ酢 大さじ2
塩こしょう
オリーブオイル
Take of the rosemary from the stem, then chop them up into small pieces.
Then salt and pepper both sides on the chicken breast.
ローズマリーをヘタから取り、包丁で細かく刻む。
鶏肉を両面塩こしょうする。

Place chicken on top of the rosemary and coat all over the chicken.
そのまま鶏肉をローズマリーの上にのせ揉み込むように両面に付ける。

Add olive oil to a hot pan and start frying off the chicken, skin side down.
When skin is browned, cook the other side.
熱したフライパンにオリーブオイルをひき鶏の皮を下にして焼く。
皮が茶色くなったらもう片面もシッカリ焼く。

After both sides of chicken is cooked, add balsamic vinegar and honey.
Heat until it turns into almost like a syrup and coat on the chicken as you cook.
鶏肉が両面焼けたらバルサミコ酢とはちみつをいれシロップのようになるまで
火にかける。この時鶏肉をソースにたっぷり絡ませる。

Slice the chicken diagonally and serve.
Easy chicken recipe ready in about 15 minutes.
鶏肉を斜めに包丁を入れ切れば綺麗に盛れます。
出来上がり
If you like any of my recipes, please 'share' by clicking below :)↓↓↓

8/21/2013

Rilakkuma Omurice リラックマオムライス

Here's a guide to making some character meals.
This might be a little time consuming but this will definitely entertain your guests! 

今日の晩ご飯はリラックマオムライス♪
キャラ弁経験者であれば簡単に、
もし作った事がない人でも準備するパーツが
少ないので、少し時間を掛けてゆっくり作ってみてください。
(1 person) 
3 eggs beaten
150g of rice
1 tbsp of ketchup
salt & pepper
1 nori (seaweed)
1 cheese (I recommend using sandwich cheese)
tweezer
a pair of small scissors
cutter knife 

(1人分)
卵 3
米 150g
ケチャップ 大さじ1
塩こしょう
海苔 1枚
チーズ(とろけるチーズなど)1枚
カッター
ピンセット
小さめのハサミ
Get your tools ready and start making parts of the bear. 
まずはパーツを作るために準備をする。

Using the scissors cut out 1 small circle and 2 semi circles out of the cheese.
Then use the scissors again to cut out 3 small lines and one very small circle out of the nori.
Assemble all the cut out nori onto the circular cheese.
チーズを半円型を2つ、丸を1つハサミで切る。
(ここでカッターの方が使いやすい方はカッターを使ってください)
海苔を小さな線を3本と小さな丸をハサミで切る。
3本の線と小さな丸の海苔を丸に切ったチーズの上にピンセットを使っておく。

Now in a frying pan with some oil, add rice and mix with some ketchup, salt and pepper.
フライパンに油を少々ひきご飯をケッチャプと塩こしょうをして炒める。

Set aside the rice then when its not too hot to touch, form a ball.
This is going to be the head of the bear.
炒めたご飯を取り出し触れるぐらいの熱さになったら
小さなボールを丸めて作る。
これがリラックマの頭になります。

Now form two small balls and stick it on the head.
Then add all the nori and the cheese that you have previously prepared. Use the tweezers to do this.
Also make a small arm and use rest of the leftover rice to form its body.
更に小さなボールを作り耳を作って頭にくっつける。
それから切っておいた海苔とチーズをピンセットを使って顔や耳にくっつけていく。
次は小さな腕を作り、残ったご飯は丸めて身体用として置いておく。

Now crack 1 egg and beat it, add 1 tbsp of water and mix.
In a hot frying pan, put on low heat and start cooking the eggs.
Do not scramble, try not to touch as much.
まずは卵を1個だけ割り、水を大さじ1加えて混ぜる。
熱したフライパンを弱火にしておき卵を焼く。
なるべく焼いている間は触らない事。

Begin to assemble all the parts. The 1 batch of egg is suppose to be its pillow.
卵をお皿の上に置いて枕にする。
その上から先ほど作っておいたご飯を並べる。

Repeat by making another batch of egg by using 2 eggs.
Place on top of its body.
卵2を割りまた同じくフライパンで焼く。
焼き終わったら身体の上に乗せる。

What a cute sleeping bear :)
出来上がり

Usually Japanese omurice is eaten with some ketchup on top.
I ate mine with some demi-glace sauce which goes perfectly well with omurice.
ケチャップやデミグラス、お好みのソースをかけて召し上がって下さい。
If you like any of my recipes, please 'share' by clicking below :)↓↓↓

ShareThis